Critical Success Factors When Chip Budding
This past summer I have taught some chip budding classes. In preparation for those classes I had people work their way through the section of this website dealing with chip budding: https://thefruithouse.weebly.com/chip-budding.html
Below is a summary of the major concepts ("critical success factors") covered in that section of the website.
Factor 1 - Don't Let Cuts Dry Out
Minimize "open time" to prevent the cuts on the chip and the understock from drying out. Some people mist the chip and the cut in the understock to prevent drying, but if the cutting and wrapping operations are accomplished rapidly then the misting shouldn't be necessary.
Some descriptions of chip budding give an order of which is cut first (the notch in understock or chip) and even which knife stroke is executed first (the 45 degree angled cut at the base or the longer parallel cut). It turns out that order is not nearly as important as how fast accurate cuts can be made, the chip inserted, and the wrap made.
Factor 2 - Don't Touch The Cut Surfaces
Don't touch either of the cut surfaces since oils on the surface of your fingers can inhibit the callusing process that creates of union of the chip and the understock.
Factor 3 - Match Size of Chip With Size of Notch
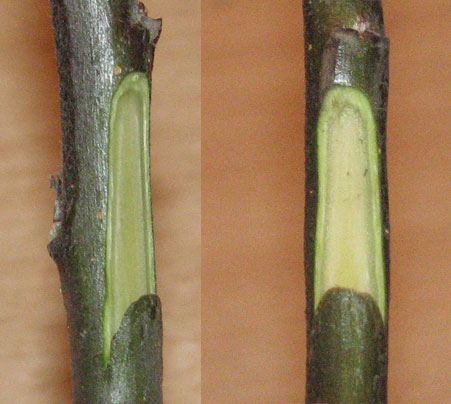
Match as closely as possible the chip with the notch created in the understock to receive the chip. The idea is that the cells of the undestock cambium and the cells of the chip must create callused union. Below on the left you have the image used in the Cornell University description of the chip bud process. Below on the right you have the image found in the current edition of Hartmann and Kester's Plant Propagation: Principles and Practices. It shows a substantial boundary between the chip and notch created to receive the chip. This image may be more realistic in terms of how closely the chip matches the notch in production chip budding. The point made by the Cornell University image is that the closer in size the chip is to the notch the quicker and better the callusing process. It should be noted that you never want the chip to be larger than the notch, because then you do not have the possibility of the formation of callusing cells.
Below is a summary of the major concepts ("critical success factors") covered in that section of the website.
Factor 1 - Don't Let Cuts Dry Out
Minimize "open time" to prevent the cuts on the chip and the understock from drying out. Some people mist the chip and the cut in the understock to prevent drying, but if the cutting and wrapping operations are accomplished rapidly then the misting shouldn't be necessary.
Some descriptions of chip budding give an order of which is cut first (the notch in understock or chip) and even which knife stroke is executed first (the 45 degree angled cut at the base or the longer parallel cut). It turns out that order is not nearly as important as how fast accurate cuts can be made, the chip inserted, and the wrap made.
Factor 2 - Don't Touch The Cut Surfaces
Don't touch either of the cut surfaces since oils on the surface of your fingers can inhibit the callusing process that creates of union of the chip and the understock.
Factor 3 - Match Size of Chip With Size of Notch
Match as closely as possible the chip with the notch created in the understock to receive the chip. The idea is that the cells of the undestock cambium and the cells of the chip must create callused union. Below on the left you have the image used in the Cornell University description of the chip bud process. Below on the right you have the image found in the current edition of Hartmann and Kester's Plant Propagation: Principles and Practices. It shows a substantial boundary between the chip and notch created to receive the chip. This image may be more realistic in terms of how closely the chip matches the notch in production chip budding. The point made by the Cornell University image is that the closer in size the chip is to the notch the quicker and better the callusing process. It should be noted that you never want the chip to be larger than the notch, because then you do not have the possibility of the formation of callusing cells.
|
|
Getting things to fit
Factor 4 Selection, Preparation and Storing of Bud Sticks
The bud stick is selected from this years growth and has mature "resting" buds just in back of the leaf petiole. The weak, willowy growth at the end of the shoot is discarded and only the lower part of the scion with mature buds is used as a bud stick. The leaves are cut off with scissors leaving the leaf petiole as a handle to guide the chip into place for wrapping. They should be kept out of the sun while chip budding and refrigerated for future use. The sooner the chips are used the better (although most bud sticks can be kept for several days in a refrigerator).
The bud stick is selected from this years growth and has mature "resting" buds just in back of the leaf petiole. The weak, willowy growth at the end of the shoot is discarded and only the lower part of the scion with mature buds is used as a bud stick. The leaves are cut off with scissors leaving the leaf petiole as a handle to guide the chip into place for wrapping. They should be kept out of the sun while chip budding and refrigerated for future use. The sooner the chips are used the better (although most bud sticks can be kept for several days in a refrigerator).
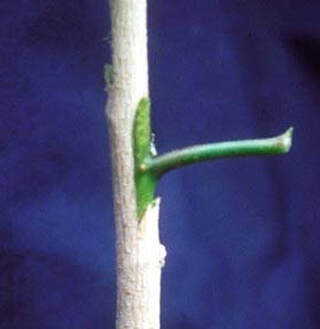
To the right is a picture of of a mature "resting" bud nestled behind the leaf on a current year shoot (it is brownish and looks like a little bump between the shoot and the leaf petiole). After discarding the final 4 or 5 inches of immature growth, the remaining 18 inch shoot had more than a dozen excellent mature buds located behind each leaf petiole that could be used in chip budding. |
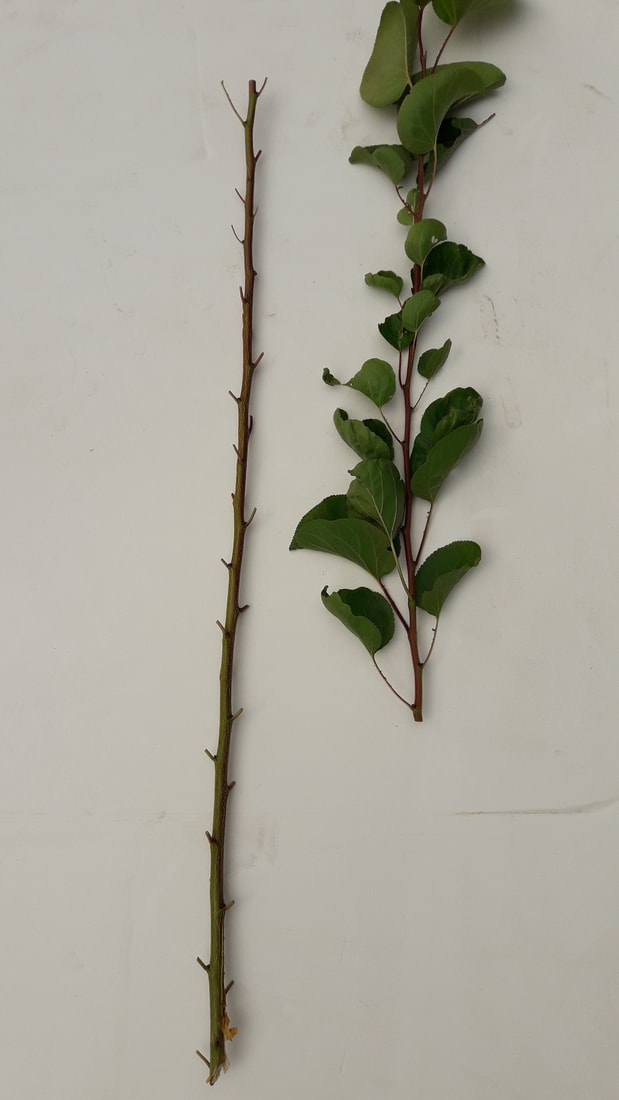
At the left is an example of substantial growth of this year's wood on an apricot tree (both sections were a single shoot of current year growth. The part on the right in the picture with wth leaves still on has immature buds so that section was discarded. The bud stick on the left has lots of mature buds and has had the leaves removed, leaving the piteloe to handle the bud the with.
Generally one starts using the chips near the bottom of the bud stick, working their way up as they complete chip buds on understock. A piece of masking tape can be placed on the upper end of the bud stick to identify the variety. 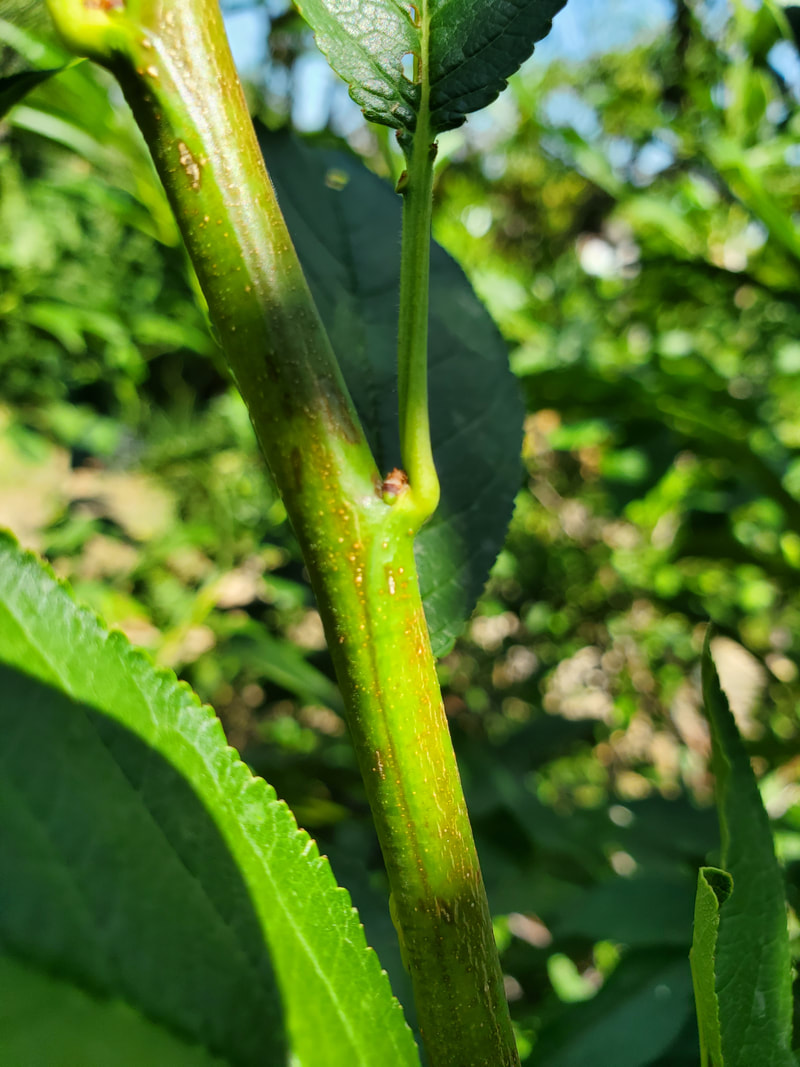
|
Factor 5 Pressure and Covering
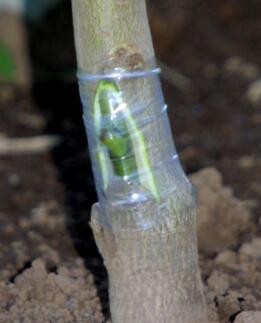
The objective of wrapping is twofold - to apply pressure to the union of the chip to the undestock and to prevent loss of moisture at the union of the cut surfaces. The most commonly used wrapping materials are parafilm, polyfilm, and budding rubbers (the same kind used for T-budding). The popular Buddy Tape is a type of parafilm. Two of the significant advantages of parafilm are not needing to tie off (it adheres to itself when stretched) the end of the wrap and not needing to remove it (the bud will grow right through a single thickness of parafilm).
Do you cover starting from bottom to top or top to bottom? It sheds water best if the wrapping is from the bottom up. However, some budders find it is easier to maintain the bud in place if they wrap from top to bottom. The main point is to prevent the chip from moving out of position and cover all cut surfaces. In the workshop I will be demonstrating some ways of approaching the problem of chip movement while wrapping.
Factor 6 Knife Skills (Eye Hand Coordinations) To Match Chip With Notch
Up above Factor 3 was titled with the injunction, "Match Size of Chip With Size Of Notch." Of all the aspects of successful chip budding this one is the most elusive. Here we will run through some of the corrective measures you can take to get them to match. Fortunately, matching size, is challenging, it is something that can be improved with practice. In this section I review some of the things said above, but with additional hints that can be helpful in getting the match just right (i.e., good enough).
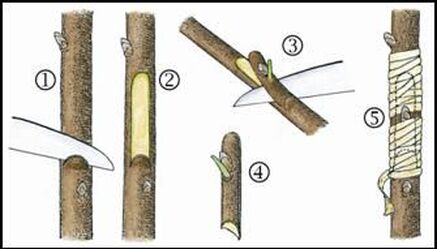
Above is the classic stylized drawing of the stps in the chip budding process.
#1 and #2 show the creation of a notch in the understock (either current year or last year's growth). The notch is made along a smooth (no buds) section of the understock. Over on the right is a photograph of the complete notch shown in #2 above. #3 and #4 show the creation of the chip. #5 shows the final wrapped chip bud with the bud and petiole exposed when using a budding rubber or polyfilm. However, if you are using parafilm (preferred over a budding rubber or polyfilm) the bud and petiole can be covered with one thickness of film because the bod can grow out through parafilm wrap. |
|
So what do you do if the chip doesn't match the size of notch? If you have lots of mature buds available you could cut a new chip (steps #3 and #4). Or you could modify the notch by lengthening at the top it or widening it (or moving the chip to one side if the notch is already too wide). The revised notch needs to remain smooth over its entire length, maintaining a single flat plane. You will sometimes see in a demonstration the bud is shortened by cutting a little off at the top (see You Tube "Bud Grafting Wild Plum Stock" by Cumbrian Homestead as an example).
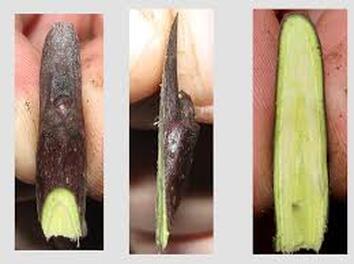
To the left are three photographs of a chip bud from three angles. Over on the far left we have a view of outside of a chip bud, then a side view of a chip bud, and then the inside view of a chip bud (the part that faces into the notch created in the understock).
In the image on the far left down at the bottom you see a light colored area which was exposed by the angled cut made at the bottom of the chip. The angled cut is somewhere between 45 degrees and 20 degrees depending on who is explaining how to create the chip. The notch into which the chip is inserted is the mirror image of the chip. This zone where these two angled notches meet will usually have a lot of callusing activity as the union is formed due to the flow of nutrients from the roots out to the periphery of the tree.
In the image on the far left down at the bottom you see a light colored area which was exposed by the angled cut made at the bottom of the chip. The angled cut is somewhere between 45 degrees and 20 degrees depending on who is explaining how to create the chip. The notch into which the chip is inserted is the mirror image of the chip. This zone where these two angled notches meet will usually have a lot of callusing activity as the union is formed due to the flow of nutrients from the roots out to the periphery of the tree.
Factor 7 Wrap Overall Chip Bud With Protective Shield Of Aluminum Foil
In very hot locations it may be necessary to place an aluminum shield around the budding location to reflect sunlight/heat away from the newly inserted chip bud. For an example of this preventive practice, see J Sacadura's You Tube, "Grafting Fruit Trees|Chip-Bud Grafting Fig Trees" after you have watched "Grafting Fruit Trees|Summer Budding of Plums, Reaches, Apricots, Kiwis and other fruit trees."
Factor 8 Prep Cells of Host and Donor With Good Watering
Although it may not seem like it qualifies as a success factor, you increase the chance of a successful budding if both the source of the bud stick and the understock to which the bud will be affixed has had a good watering a day or two before budding. If you we taking the bud stick from a tree that can't be watered before taking the bud stick (e.g., it is a tree in an abandoned orcharchard without a source for watering) then be sure to water the understock.
Site maintained by Mike Chase of Spangle Washington. You can contact him at [email protected]
